Getting Started with Godot
Introduction
Godot is one of the most popular game engines in the world, used mainly by indie developers. In this tutorial, we'll walk through the basics of the Godot interface and create a simple game to get you started on your game development journey.
What You'll Learn
- Understanding the Godot interface
- Creating nodes
- Adding scripts
- Basic game logic implementation
- Testing your game
Prerequisites
Before starting this tutorial, you should have:
- A computer that meets Godot's system requirements
- Godot installed
Step 1: Setting Up Your Project
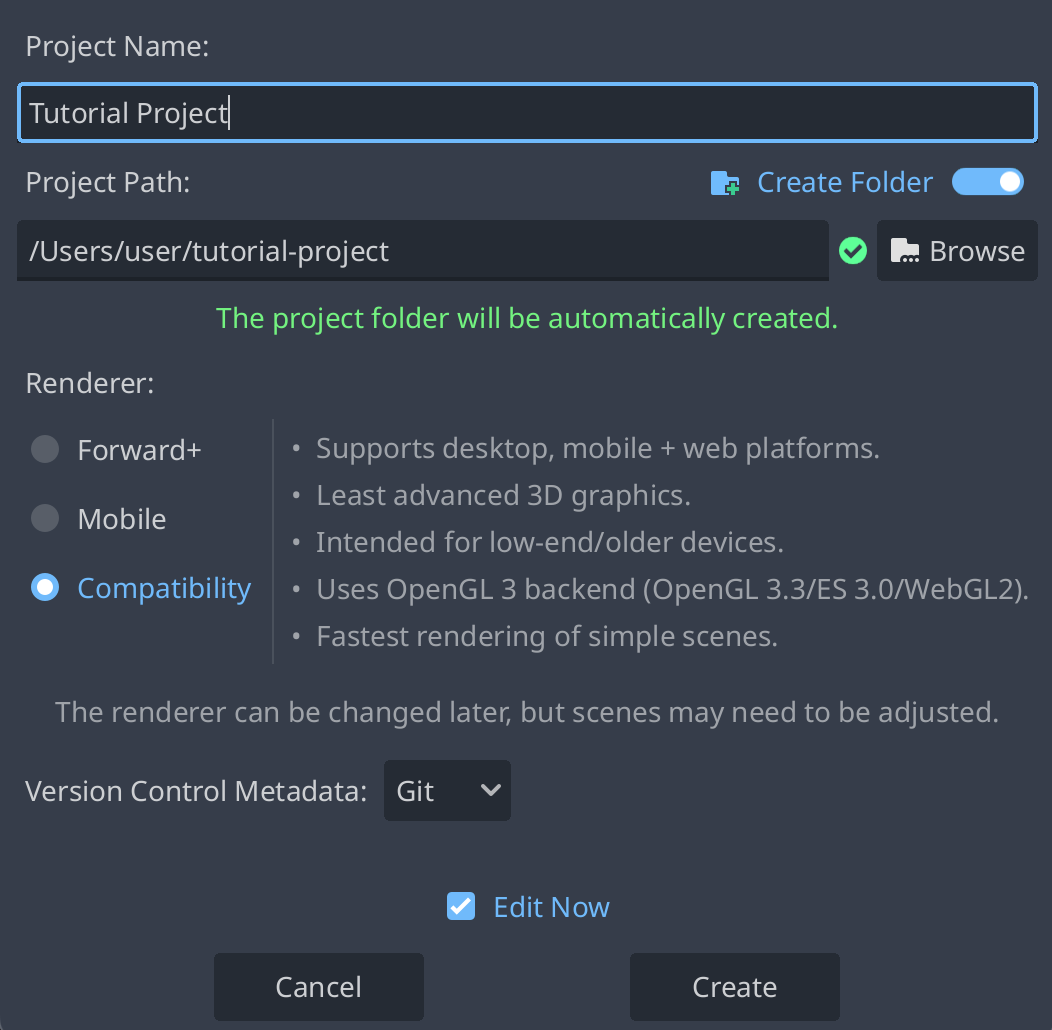
First, let's get familiar with the Godot interface. When you open Godot, you'll see a window with an empty list of projects. To create your first project, click the 'Create' button at the top left of the window. In the window that pops up, we'll be able to name out project and choose the file path it'll save to. The renderer option below won't matter for now but can be changed later in settings. Clicking create will open the project in the editor.
Step 2: Understanding Your Environment
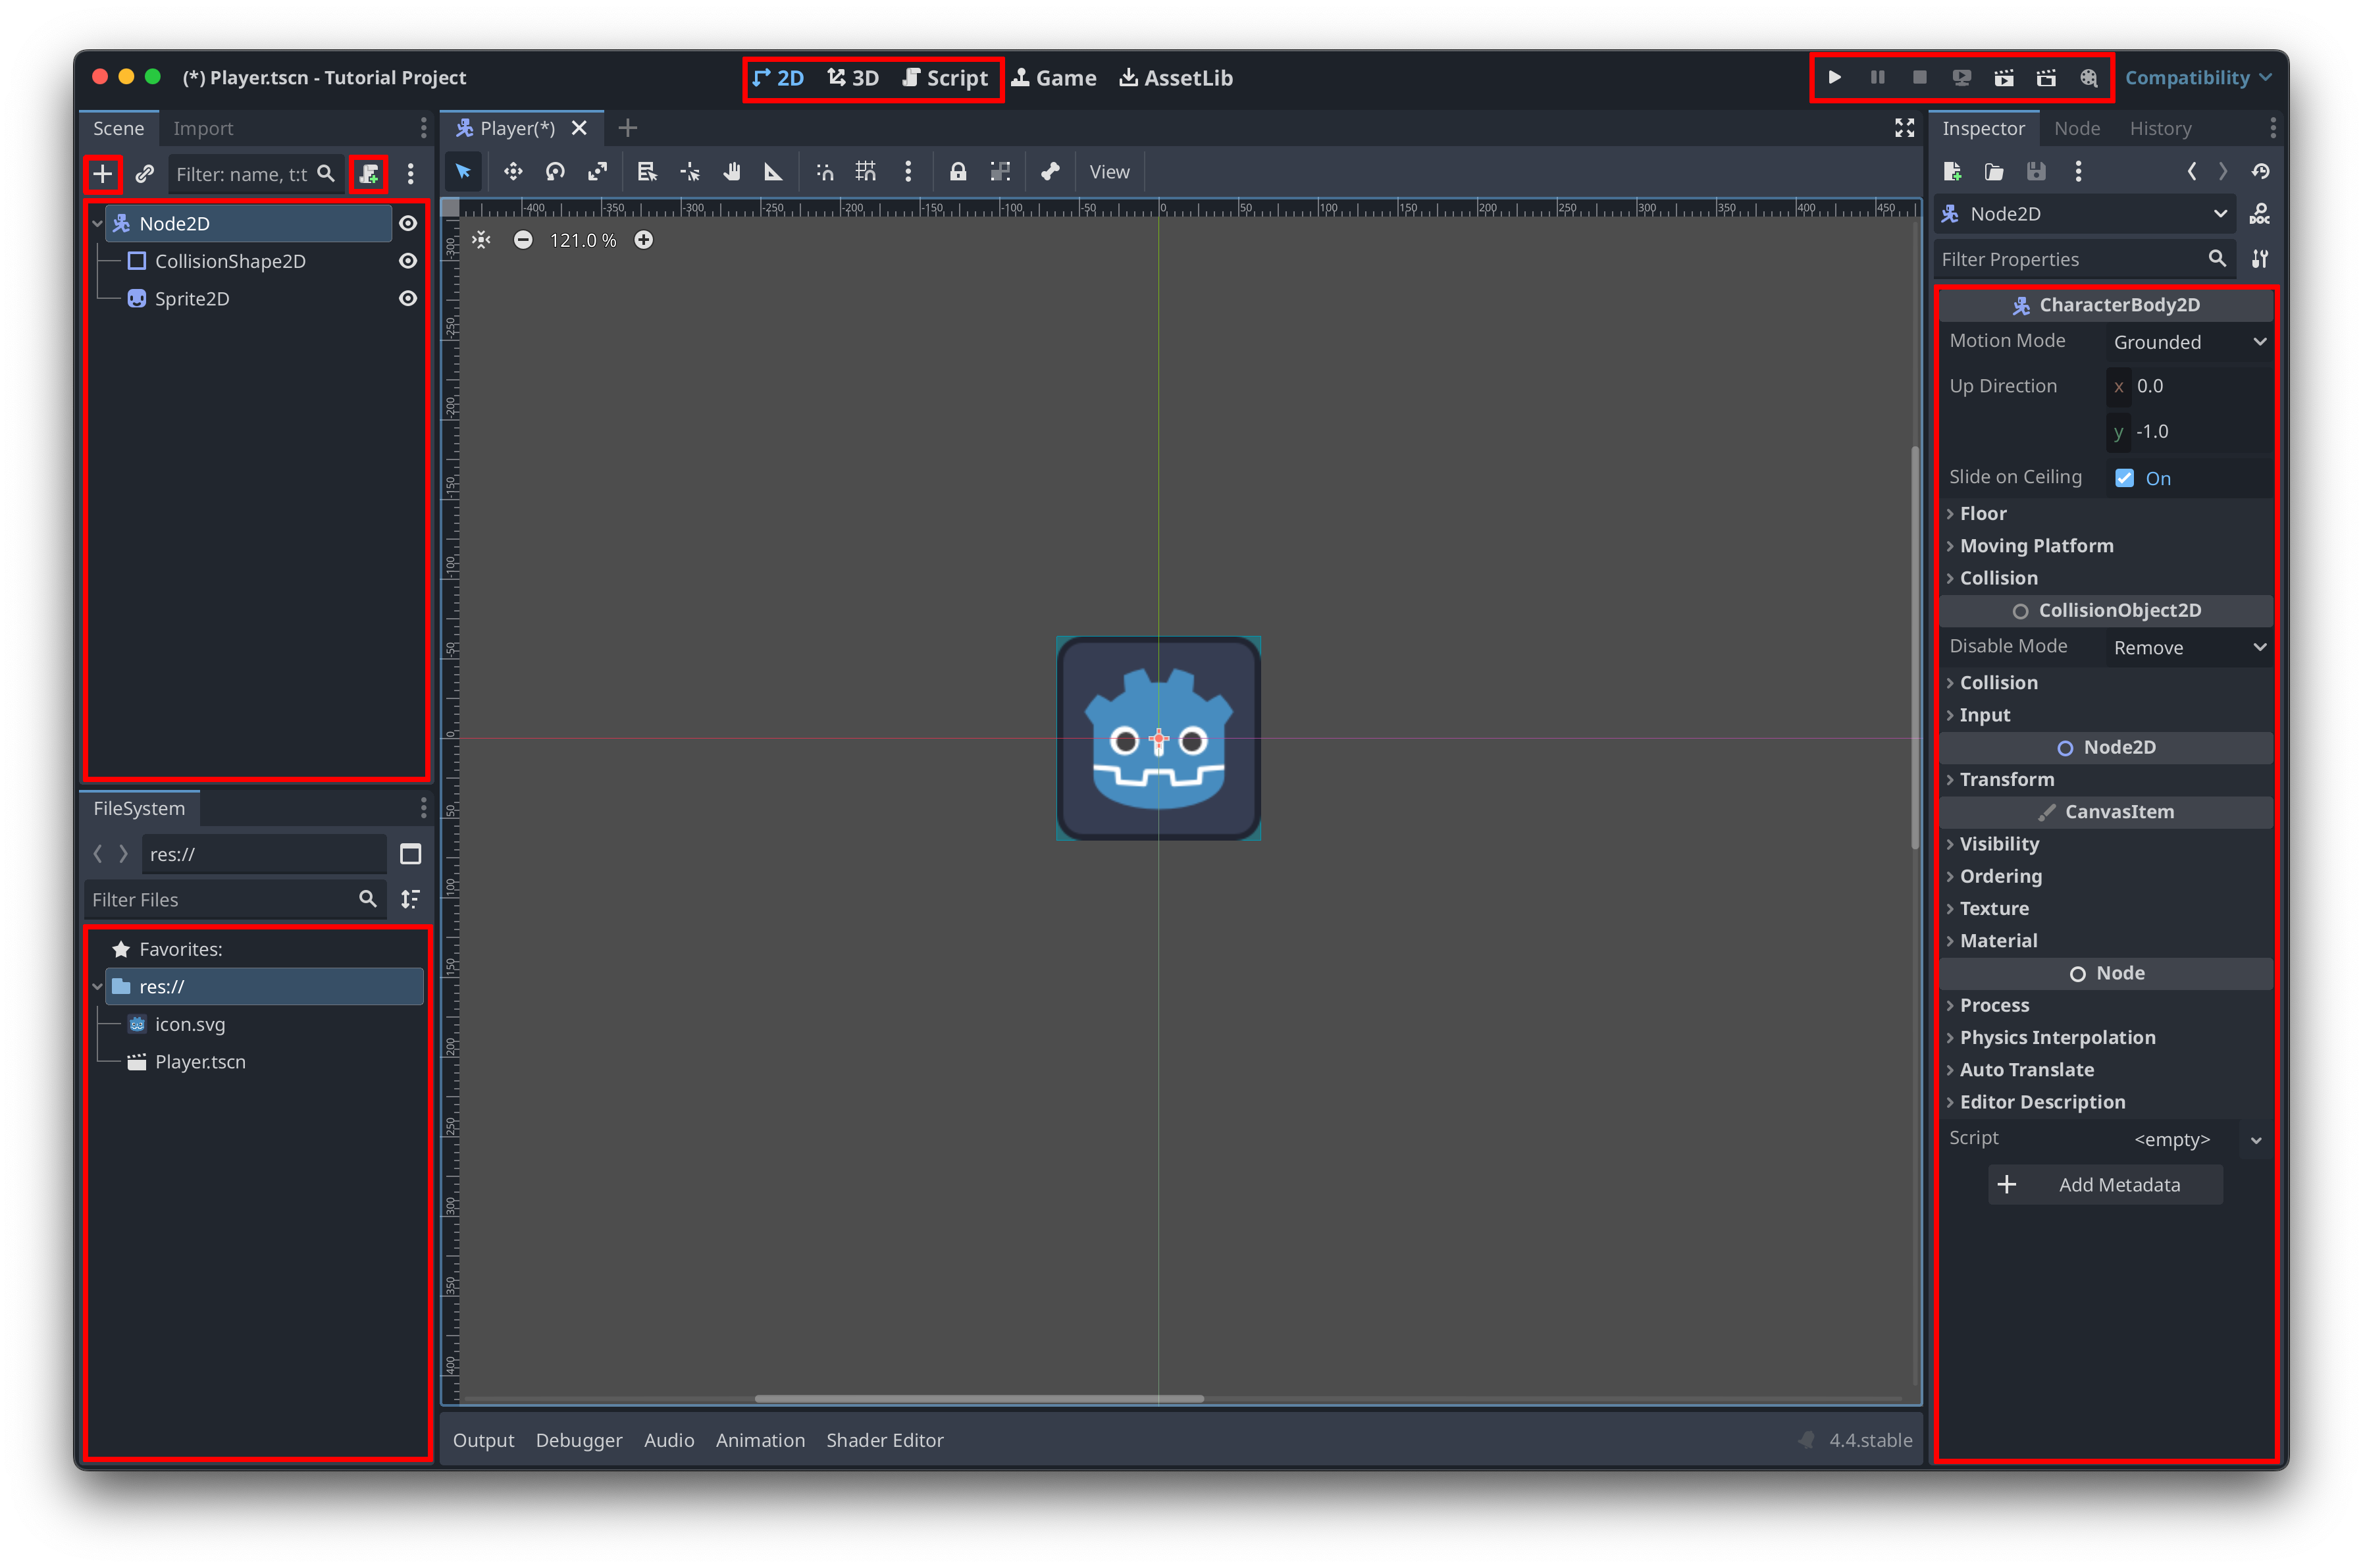
Now that we have our project, let's learn what all of these buttons do. First we must understand the scene tree. The scene tree is the box to the left that currently says to select a root node. For this tutorial we will select '2D Scene'. This will give us our first node labeled 'Node2D'. This is our root node and will be what we add all of our nodes to. Currently, it is just a random object that does nothing. Lets transform it into our player character!
To begin making our character, right click the root node and select 'Change Type'. This will pop up an overwhelming amount of options. Luckily there is a search bar. Our player will be controlling a character with physics so let's search up the physics body named 'CharacterBody2D'. This won't change our node's name for us so right click our node again and click 'Rename' and rename it to 'Player'.
You may notice a few problems. First, we still can't see our player. Luckily, this is an easy fix. We don't have any art yet so let's just use the temp art present in all godot projects.
This leads us to our File Tree at the bottom left of the editor. This window has all of our files listed. Currently our only file is 'icon.svg' which is exactly what were looking for. Select and drag it into our scene, and you'll see that it automatically created a 'Sprite2D' node in our scene tree. It may be difficult to line the sprite up perfectly centered so let's move over to our final window on this page, the Inspector window
The Inspector window contains all attributes and properties in our nodes. In this case we are looking for the 'Position' of our node. To find this property, you can either search it in the search bar, or select the 'Transform' drop down menu to reveal all positioning and scale properties of our 2D node. To center our sprite, we'll want it at (0, 0) which can be done in 2 ways. Either type 0 in manually to the x and y property, or press the small reset button next to the 'Position' title. Now we have a placeholder art for our player!
Now for that other issue with our player, we have a small warning in our scene tree next to the character body that we need to fix. The 'CharacterBody2D' node is a physics node which means it needs a collision shape to interact with the environment. Let's add one! To add a node to the root node, select the character body at the top of the tree, then either select the small plus icon at the top left of the screen or press ctrl + a. This will open our node window again. Search for 'CollisionShape2D' and add it. Next we need to pick a shape for our player. For now, let's make it the same shape as our player. In the Inspector window, select the '<empty>' slot next to the 'Shape' property and select 'New RectangleShape2D'. This will make a rectangle, but you may notice it is much smaller than our player. Simply click on the same slot to open the rectangles properties, and edit the 'Size' property to be 128x128 to match our sprite.
Now we have a functioning player! To see our player in action, select the 'Run Current Scene' button marked as a film slate at the top right, or press ctrl + r. This will request us to save our scene before running. Let's save it as 'player.tscn'. Now that our scene is running you may notice, nothing is happening. This is because our player doesn't have any gravity or movement yet.
To add this functionality, select our character body, then click the 'Attach Script' button right above it, marked as a scroll with a green plus icon. This will pop-up a new window with a few things to change. First, ensure the 'Template' option is selected and lists 'CharacterBody2D: Basic Movement'. This will do all of our basic coding for us so we can focus on the other parts of our game. Then click 'Create'!
Clicking create will open our script window with some basic code already done. If you would like to try and understand the code there are some comments explaining it but we're not gonna go over it in this tutorial. Now that we have our script attached, let's return to our scene by pressing the '2D' menu at the top of our screen. Now we can try running our scene again. You should see that our player now falls and can be controlled using the arrow keys! We have successfully created our player and are ready to use it. Make sure and save by pressing ctrl + s.
Step 3: Piecing together your game
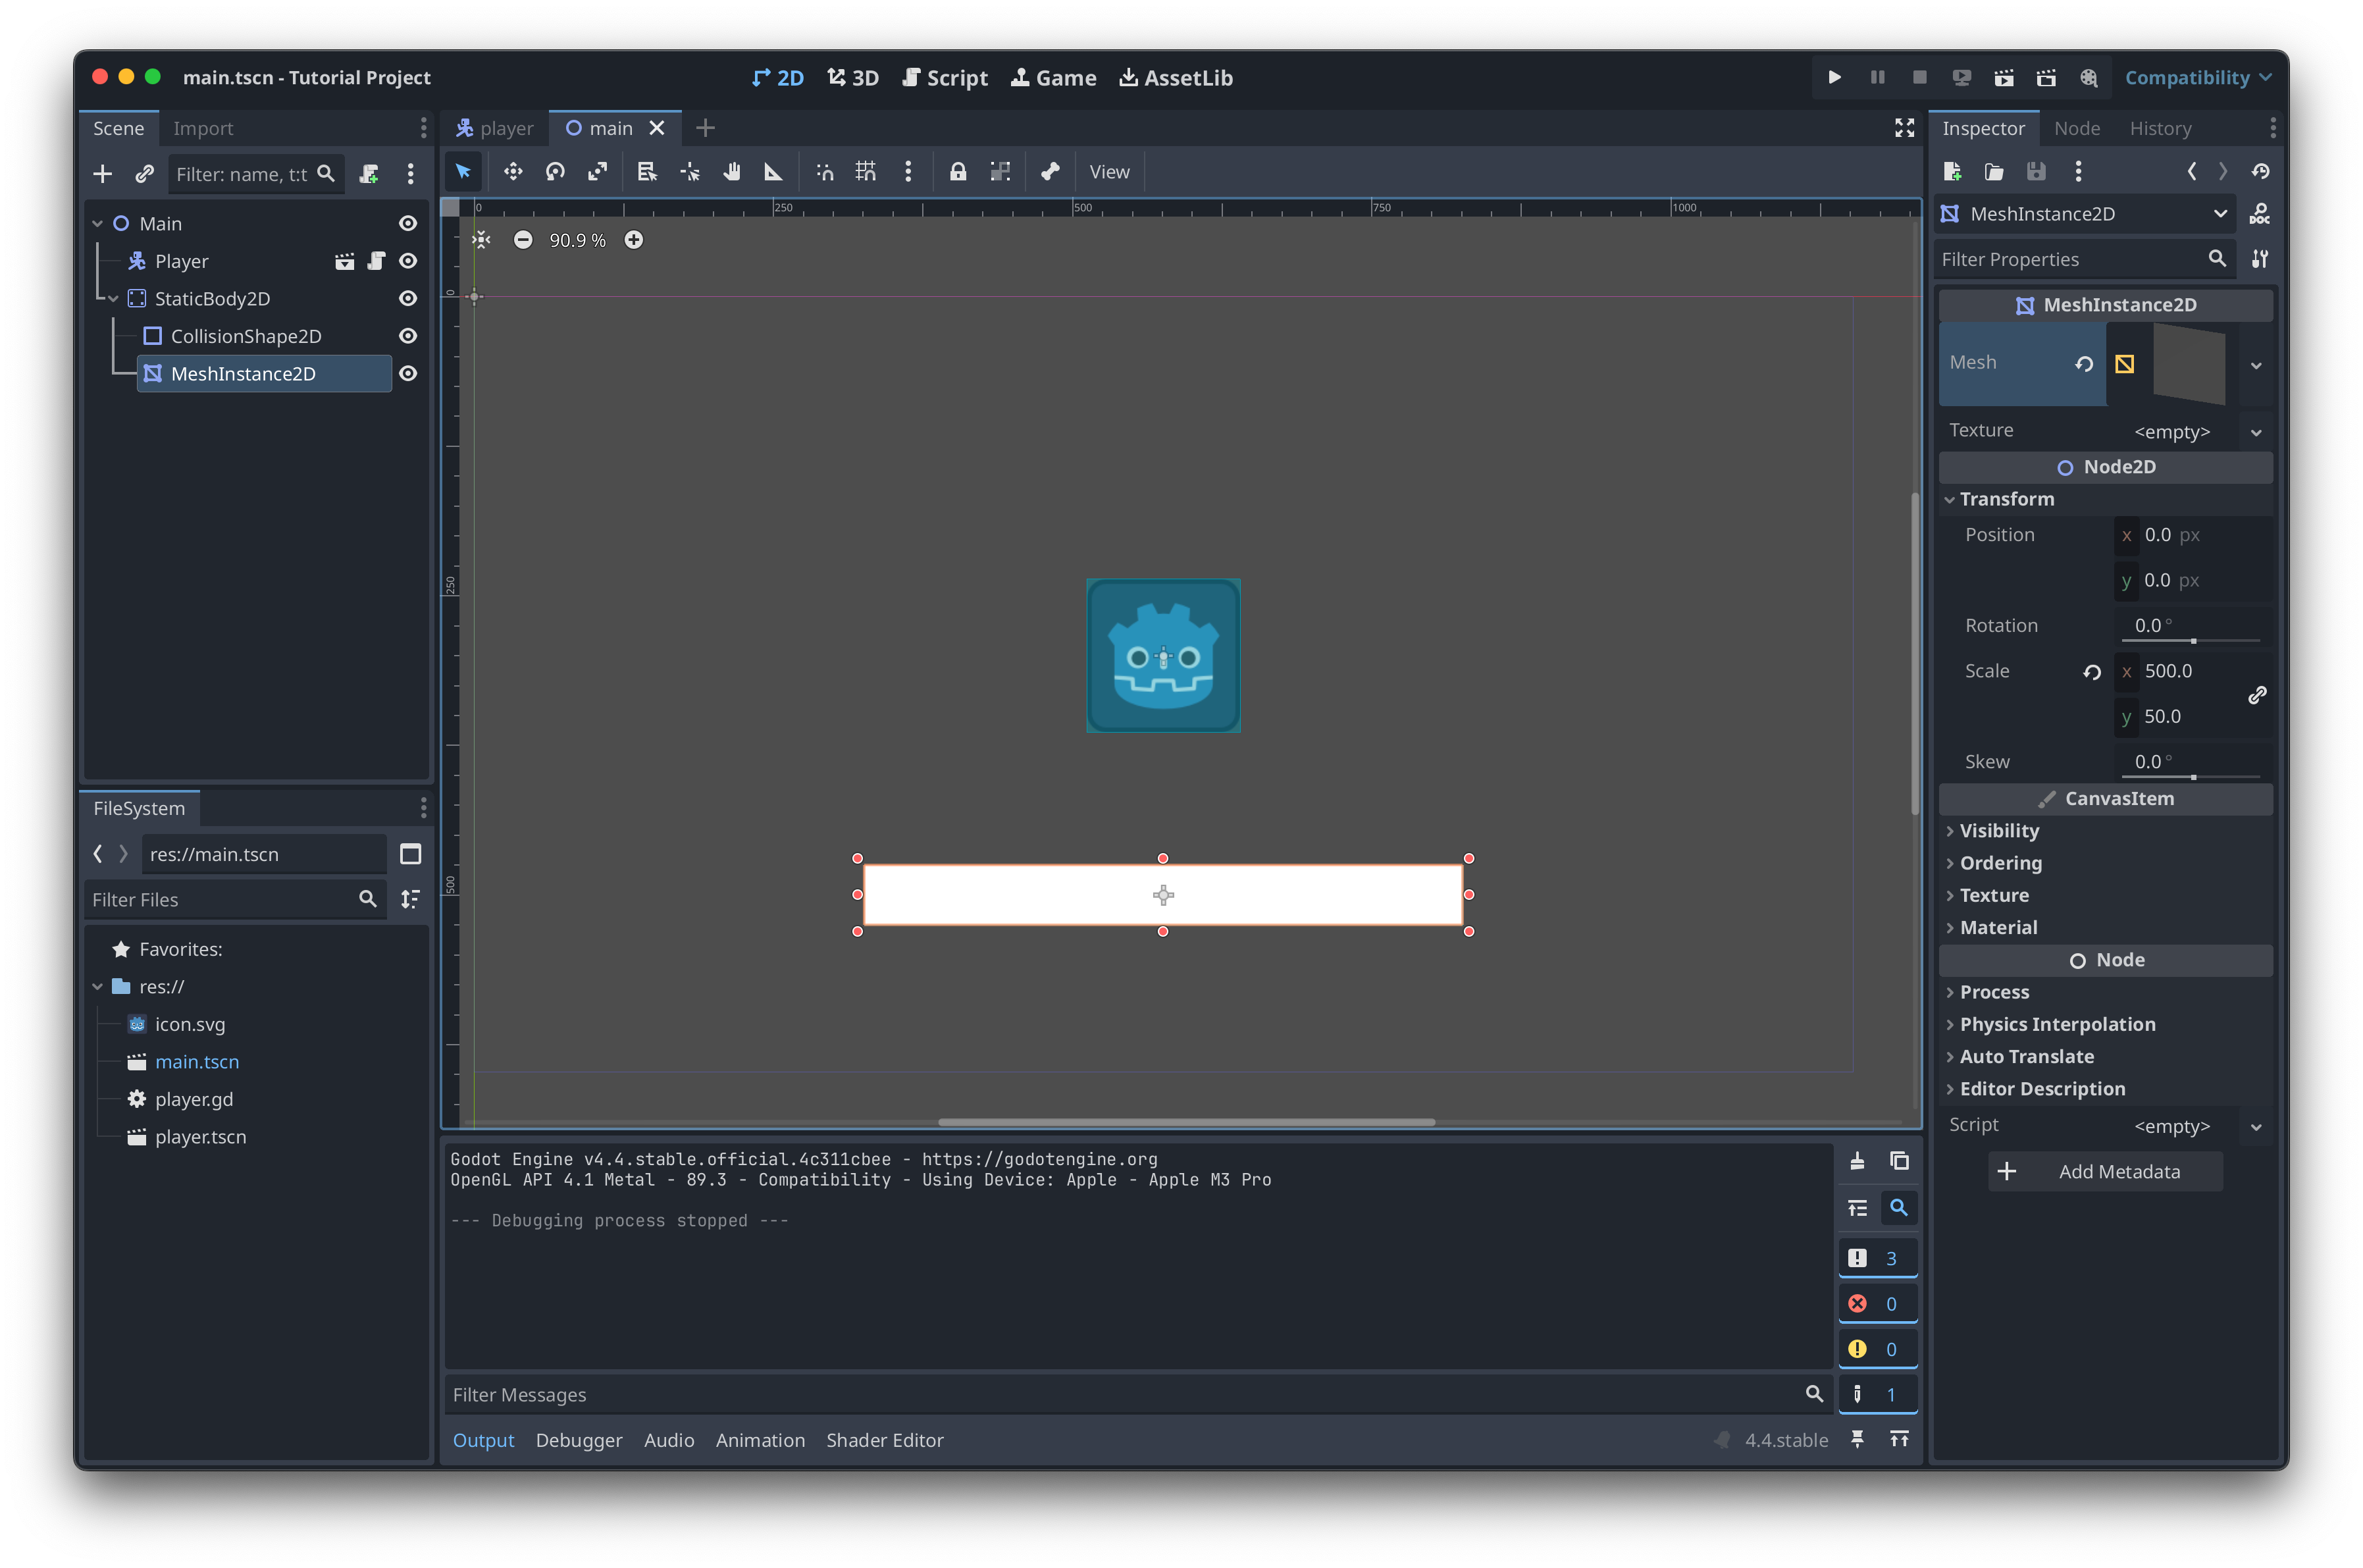
Now that we have a player, let's make a game area. Create a new scene by clicking the small plus icon right above our environment. Select '2D Scene' for our root node and rename it 'Main'. Now that we have a level, lets add our player to it. Click and drag our player scene from the file tree into our scene. This is the basic object and node format of Godot.
All scenes are nodes and can be added into eachother, making it very easy to replicate and mass edit our objects. Because of this we can make components and other objects that can be drag and drop attirbutes. Instead of remaking a health bar and health system for each entity, we can just make one and add it to each of them. Instead of making a unique weapon for each new special ability, we can make just one weapon and add attriubtes to it. Heck we don't even need to make new enemies. We could just make one enemy and add things to it to make it different.
I'm getting ahead of myself, let's get back to our project. Now that our main scene is set up, we can run our game by pressing the play icon in the top right or by pressing ctrl + b. We haven't selected our main scene yet so when the window pops up to select one, press 'Select Current'. We have a game! But wait, we just fall into the void. That's not a game.
Let's first add some ground to fall onto. Add a 'StaticBody2D' and give it a collision node to act as our floor. We need to pick a shape for this one as well so select rectangle. We don't need to go through the proccess of typing in its exact size so let's resize and move it in the environment using our mouse. You can click and drag on any of its vertices to resize it, then click and drag on the inner part to move it. A little tip for resizing, you can hold alt while resizing to keep it uniform and change both sides. Drag it underneath our player so we can land on it and walk around. We can now move around with our arrow keys and spacebar.
One problem, we can't see our platform. We could use the temp art we used earlier and resize it to fit our floor but that might look a little goofy. Let's use a mesh instead. Click on our static body and add a 'MeshInstance2D'. For its mesh type, select 'New QuadMesh' and resize it in the environment to fit our platform's collision box. Now we have a visible floor to stand on!
Conclusion
Congratulations! You've created your first simple game in Godot. You've learned how to navigate the Godot interface, create and manipulate nodes, and add basic movement mechanics. This is just the beginning of what you can create with Godot.
Next Steps
- Add more game objects and interactions
- Find or create assets to customize you game
- Try creating a simple game like a maze or a simple platformer
